Thursday, 9 May 2019

Great Timing - final

Final animation!

Unfortunately, due to personal reasons, this project was a struggle for me to complete. Pacing was a huge issue I had which was not apparent until i was editing the scenes together. On the positive side, this was an opportunity to put my premiere pro skills into practice. I edited the clips in different ways to adjust the individual pace of each part. I think this was a successful attempt.

I set out to create a horror piece that had some cinematic and complex animation (such as the rotation and sink of the seal). In post-production, I decided to deviate from the storyboard slightly by adding in flashes and removing a scene because I wanted to increase the tension by adding some disorientating effects. While my soundscape I had made for my animatic had failed, I edited down the number of sounds for the final( namely a beating heart and excessive static noise). Originally, I had wanted to use the rushing wind to establish the setting, emphasise the isolation (no animals or human noises) and hint at the themes of nature. Then, I was going to have loud static overwhelm and fade out on top of the wind. In the animatic, the feedback I got was that this was too noisy. It did not add to the suspense but instead induced headaches. To combat this, I used the static sparingly and had the two noises melt in and out of each other.

In the future, i would limit the amount of backgrounds I needed to use as I think it would have provided a better sense of space. It would also allow my timing to be a little better as the viewer would be able to register the action of the scene easier.


EVALUATION SHEET EXTRACTS

The purpose of this module was to develop our understanding of the animation production pipeline as we completed all steps from pre-production to post-production work as a single person team. By doing this, I feel I have a disillusioned sense of how long each process takes and the importance of setting limitations to a project. This module has better prepared me for group work as I now know to limit my ideas from the beginning to not over extend my team. I think it is also to improve our understanding of techniques such as how to build an armature and create walk cycles. Surprisingly, I think that the best work I made in this module was the creation of the stop motion armatures and the walk cycle. I think that I made deliberate and well thought out choices when making my model that elevated the standard of my work. For instance, taking the time to source fabric and stitch together the clothing allowed for it to better match my designs than sticking to plasticine would have. It also allowed for cleaner moving when animating as the fabric didn’t dry solid like the plasticine would have. When animating, I considered the force of the wind and how to best hint to his character. Overall, I was more conscious of each choice I made in this process.
Due to personal circumstances, I was not able to apply myself to this module at the level of focus I had anticipated during my early pre-production. The goals I set out for myself in the beginning were not reachable in the situation I was later in. I did not set firm limitations to the task such as limiting the number of backgrounds or textures I could use; this effected the professional level of my work as I could not streamline the animation process to better meet the brief, One of the main issues I have with my animation is timing. I feel that with experience, gauging how long an action convincingly takes and how much to add on will become more instinctual. In the future, I will seek more feedback from peers on the pace of each scene. While being experimental is useful in pre-production in order to try out new ideas, considering the time limit of the project, I should not have jumped from different mediums (pencil to watercolor to digital). I have learnt that the limitations set before the development of a project are vital to ensuring the brief is met. I feel that if I had limited the story to three or four settings, each stage from the storyboarding would have been more suited to the 30 second time limit. My storyboards moved too quickly which prevented good pacing for each scene. I did not notice this until after editing the scenes together in post-production where I did my best to fix this. Despite planning my animation by seconds, I have produced scenes that are too fast to register for the viewer. Next time, there are several things I should do to fix this issue: firstly, my animatic should have been much more developed as the still images did not inform me at all. If I had done this, I could have fixed the timing by adding frames and filler. Another way I could have prevented this is by planning less scenes and pulling the narrative back to a smaller part of the story. In this module, my confidence in software has grown and I have utilized the skills I have learnt in photoshop to make some animation easier and smoother. When working on the stop motion armature, I feel that my thought process was more purposeful than in other tasks. Next time, I would like to maintain this focus and it will be more effective on a project with more realistic restrictions. While I feel that my techincal skill has grown throughout this module (such as the seal and expression scenes being at a higher standard than I could ahcieve before), i know that the timing does not allow for the overall piece to register.

Working as I go


Week 1-2
Researched genre of Horror, Brainstormed character designs and developed story.

Week 3-4
Scripting and story boarding. Reworking designs based on feedback and focusing on themes.
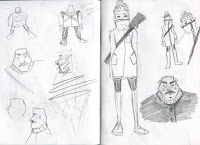
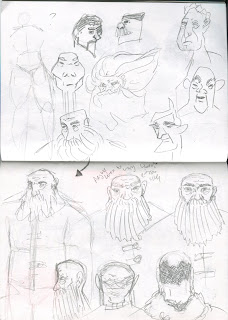
My characters were too cartoon-styled and friendly looking so I started to play with different silhouettes.
I drew from reference and then tried to apply that to new designs.

Week 5-6
Maya workshops. I attempted to create a tent for my DIY modelling task using eClothe but I don't fully understand the workspaces and how they effect the tools.
Restoryboarding

Week 7-8
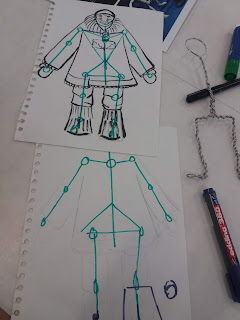
Wire armature building. Sculpting the face plate.
Creating armatures takes time. I had the option of using Plasticine once i'd built the foam and bandage base. I chose to use air-dry clay instead as it won't crack when I move the head. I have decided to also make clothes for the puppet instead of using Plasticine because I really like the textured quality of my designs . I started sourcing fabrics to use.
Collecting more sounds.

Week 10-11
Creating clothes for wire armature and waiting for face plate to dry. Painting the face plate and attaching hair. I painted the clothes also to add wear and grime. I really enjoyed the experience.
Filming walk cycle and collecting sounds for animatic.
Working on my DIY maya piece- spear

Week 12-13
Reworking animatic and beginning animation process by sketching key frames.
I do not feel confident with my backgrounds. The feedback I received from peers is that they don't mesh well with the character as they are too textured in the same way. I have experimented with using oil brushes in Photoshop ontop of a textured background to mix and smooth the texture. I like how this fades out the background and still has textures.

Week 14-15
Animating
I started by filling in what I had started the week before with in betweens as well as sketching out the other scenes, limiting it to the time frame on the storyboards. I realised that inbetweeing did not work for the seal scene as the seal was losing its shape as it dropped. I switched to drawing straight ahead which helped smooth out the motion.

Week 16-20
Animating. Post Production. 
Deviate from storyboard- I did not have enough time left to execute the longer and more complex shots left so I toyed with other, faster scene ideas that would still progress the narrative.
Finished all the scenes.
I began editing the animation together. I noticed that the pacing was all wrong- all the scenes individually looked right and played well but, when together as a sequence, there was no room to register the action of the scene. I used premiere pro to add frame holds and change the play speed of certain clips to help remedy this.
I also added flashes and rearranged clips to ramp up the intensity of the piece and give a feeling of disorientation as the story shifts from normal to supernatural.

SketchBook


Animatic


Here is my animatic. Unfortunately, I exported it wrong and lost the sound. However, I did receive feedback on the soundscape I had made prior to this (it was too complicated and lost impact). (will be in submission folder)
The sounds do add to the feeling of dread but they are overwhelming and take away too much focus on the action.
The scenes can seem a bit too long so I might need to shorten later
The title card is boring and needs more visual appeal.

Scripting and Storyboarding

First Storyboard -


Script


Title – HUNTER 

EXT. BLIZZARD.  MOUNTAINOUS TERRAIN.  DAWN. ESTABLISHING SHOT

MAN trudges across back-lit snow, dragging a SEAL hooked on a line. Blood dragged across. Stationary Shot. (HARSH WIND SOUNDS)

Signs of BEAST revealed to viewer- scratches on trees. (STATIC SOUND)

FULL SHOT.
MAN struggling to cross down-flowing river, SEAL bumps off rock and falls into water, blood from SEAL blooms into water. Water tugged out of shot. (FLOWING WATER)

Camera dives into water, following blood as it flows down into darker water.

Camera bobs up to surface, face to face with carcasses and carnage.  ARIAL VIEW reveals more.

MID SHOT. MAN steeping heavily up small mound, snag of wire. Plants stick into snow.  Turns and yanks. Wire yanks back. WIND NOISES BLEND INTO RISING STATIC NOISES.

Lets go of wire. Raises stick to reveal spear, CLOSE UP shine of flint end.

MID SHOT, cautiously nears hiding behind branches. Parts branches with one hand.

CLOSE UP of horrified expression. STATIC NOISE INTENSIFIES. HEART THUMP BLENDED IN.

Hand drops Spear.

CLOSE UP reflection in spear head of figure BEAST. ZOOM IN.

BEAST back full shot, feasting on seal. Pause. Beast Turns. Blood neon bright dripping down chin. SEAL ripped open. MAN steps back, falls. HEART BEAT TAKES OVER NOISE.

Beast Screeches. BLACK. STATIC TAKES OVER NOISE.

SILENCE. GROSS WET RIPPING NOISES. LOW STATIC AND WATER FLOWING.

Credits- Blood blooming into water, forming words and drifting away.

Reflection 
I made the first storyboard after the initial design of the characters. It lacked narrative direction but, after writing the script, I had a better sense of time, place and tone. A weakness of my final storyboard is the lack of camera movements used on each board. As this is a solo project, I know the boards make sense of me as they are my vision. In the industry, the storyboard would need to be clearer with more precise notes on time and lighting so that a whole team of animators could all work on the same scene. I think this board is weak for a group project but suitable enough just for myself. On the other hand, I think that this exercise has helped pace my animation, especially on how to amp up the tension steadily. 


Wednesday, 8 May 2019

Modelling - MAYA


KEEP ON TRUCKIN' - We replicated a toy truck in Maya while looking a reference. At first, I was unsure of how to approach the software as it is overwhelming as a work space layout. However, now that I understand the workflow of Maya, modelling is less intimidating. The application of texture made the most sense to me but I struggled with combining multiple shape nets and matching odd corners together. 


DIY- I recreated the spear in my designs as the diamond point would challenge my ability to combine shapes. I kept the design simple as to not complicate the process as this was the second time I had used the software in this way. 

I understand the workflow of maya. I think in the future I may use it to create 3D references of environments- this will help elevate my work and allow myself more freedom in planning shots as the I can create accurate camera movements. Perspective is tricky and maya simplifies thatin planning an animation. 


Character Design and Development


First Concept


Redesign


Redesign 2


Redesign Three


Analysis
I went through many stages of development. My first set of designs were not best suited for the horror genre as the feedback I got was that they were too friendly looking and had an inconstant style. I felt that I need to introduce a sense of strength to the protagonist for the character to suit the setting of the story. I experimented with body shaped and beard lengths but due to the limitations on time I didn't want to over complicate the design. Next, I looked heavily at references of inuits to make new alterations to the design. Finally, I cleaned up the watercolour turnaround in Photoshop and added digital texture.

I want to blend different textures in my piece to give the appeal of traditional drawing. 

I think that I improved on my designs with each iteration. The use of a personalised digital brush will give allow for a soft textile look to come across despite using digital methods to draw. I think that the backgrounds will need to develop over the next few weeks as they look rigid. I prefer the mix of painterly brush strokes and hard digital shapes in the concept art to the background example. It looks more visually interesting and cinematic. The heavily textured second background feels childish and is not suited to horror.

limits-
pencil traditonal- difficult to do backgrounds and time consuming but allows for authentic feel and more control
watercolour- no control of pattern and not easy to remedy mistakes but looks very soft and has strong texture.
digital texture- looks articfical but more control and easy to apply backgrounds and animate quickly

2D walk Cycle


In this walk cycle, I considered how the arms where effected by what he is carrying.

ROTOSCOPE


The monster runs in an animistic manner.

I made three walk cycles- one in stop motion, one 2d drawn and one rotoscoped (using multiple 'animal run' tutorial videos for reference). I have learnt that pace is the most important thing in walk cycle; it describes not just the effect of the environment but the age, mood and health of the character.

Puppet Walk Cycle

Construction


My armature is articulate. I used more dense foam sections to limit how far the spine can bend because of the age and stature of my character. His feet are also purposefully limited to suit the large, heavy boots he wears.


Walk Cycle


0:05 - Experimentation
0:05 - 0:08 - Developing character and thinking about environment
0:09 - 0:11 - Refining previous ideas

Evaluation
In this task, I learnt a great deal about the process of creating wire armatures for stop motion animation and the precision needed to achieve a successful walk cycle with the model. I gave great care in the creation of my model. I decided to sew clothes from fabric and create a clay face mask rather than use Plasticine because I saw the limitations of that medium- it is difficult to model and dries hard, making it difficult to manipulate during the walk cycle.
The fabric is more true to my design as I am after a soft, textured look.
In the walk cycle, I took into account the environment. I wanted to get across the look of struggling against the wind in my final walk.

Pitch Bible 1


My first pitch bible is simple to gets straight to the point.

The feedback I received encouraged a mixed painterly style for the backgrounds to match the textured effect i'd used on my characters. I had rendered my animatic incorrectly and had lost the sound but overall the pace of tension seemed good for the time limitation the animation had. However, the timing for each scene might be too long so I will shorten that during my animating process.

The artistic choices I made regarding the colours and saturation to reference classic films like Susperia and The Ring were complimented and the theme of hunger/feasting/deteriorating shown through motifs in the backgrounds emphases the feeling of dread.

Originally, I was going to have a loud, heavy soundscape but the feedback I received is less is more and to focus on three. I have picked: static, wind and the shriek/feeding.

Wednesday, 1 May 2019

Showreel


Here is the showreel i created to go along with the last presentation (studio brief 3).

I am not the proudest of this showreel as I feel it does not represent the best work I can make. However, I have used this year to experiment and develop from no animation experience to a more comfortable skill level. I know that over the summer and at the end of the last module for this year, I will have much more examples of work that I feel excited to associate with myself.